En este post explicare sobre el uso de el arreglo de microfonos del Kinect con un ejemplo donde a travez de las librerias Microsoft Speech SDK y el SDK de KINECT podremos a travez de comandos de voz dar alguna instruccion al computador para mostrar algo en una aplicacion C# natural en WPF…
Se me ocurrio un ejemplo similar al que nos trae la SDK Toolkit de Kinect donde al hablar se muestra el espectro de voz de la persona que habla, pero en este caso, utilizare para explicarles sencillamente como ejemplo una aplicacion que al decir un color de los que muestre en la aplicacion esta sea capaz de identificarlo y de pintarlo en la aplicación, dando un rango de exito o de fracaso…
Pensaran que es algo complejo de analizar y de sintetizar la voz y esas cosas pero realmente no nos complicaremos la vida y por suerte ya existen herramientas a la mano para hacer estas cosas como
Bien para esto es necesario previamente tener el Microsoft Speech SDK en este caso la version mas actual que es la 11.0 que la podemos descargar en el siguiente enlace: Microsoft Speech SDK v11.0
Tambien necesitaremos de una libreria de idioma en nuestro caso Español que debemos de desacargar de la pagina Oficial de Kinect en nuestro caso ES-mx (Español-Mexico) o ES-es (Español-España): Kinect for Windows Language Packs v11.0
Una vez instalado estas, procedemos ahora a crear un nuevo proyecto WPF en C# en Visual Studio 2012 o 2010 como lo vayan preferiendo.

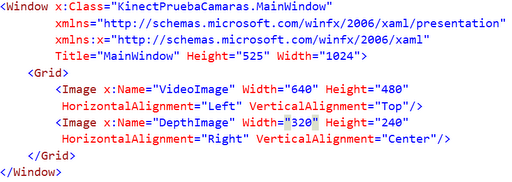
Una vez creada la solucion del proyecto nos vamos al archivo MainWindow.xaml donde escribiremos el siguiente codigo..
<Window x:Class="WpfAudioKinectPruebaHablar.MainWindow"
        xmlns="http://schemas.microsoft.com/winfx/2006/xaml/presentation"
        xmlns:x="http://schemas.microsoft.com/winfx/2006/xaml"

        Title="Kinect Audio Demo" Height="364" Width="680">
    <Grid Background="white">
        <TextBlock Text="KINECT Demo Audio Prueba" FontSize="36" HorizontalAlignment="Left" VerticalAlignment="Top" Margin="10,5,0,0" FontWeight="Light" />
        <StackPanel HorizontalAlignment="Center" VerticalAlignment="Bottom" >
            <TextBlock x:Name="tbColor" Height="100" Width="500"/>
            <TextBlock x:Name="tbInfo" Text="" Foreground="Black" Height="50" FontSize="20" TextAlignment="Center" Padding="0,10,0,0"/>
            <TextBlock x:Name="tbSpeech" Text="" Foreground="Black" Height="60" FontSize="16" TextAlignment="Left" Padding="0,10,0,10"/>
        </StackPanel>
        <TextBlock FontSize="16" HorizontalAlignment="Left" Margin="80,93,0,0" Text="diga algo para activar el reconocimiento" VerticalAlignment="Top" Width="379" FontWeight="Light" />

    </Grid>
</Window>
En el codigo aparecen tres TextBlock de nombre tbColor, tbInfo, tbSpeech estos son para mostrar una breve leyenda, el color procesado y el indice de acierto…
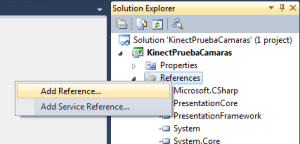
Antes de iniciar el codigo y la logica de la aplicacion debemos de agregar las referencias o DLLs que ya habiamos mencionado que son la Microsoft.Speech y Microsoft.Kinect

ahora bien, vamos con la parte mas interesante que es la de trabajar con las librerias de Microsoft Speech y por supuesto la libreria de KINECT sdk, procedemos a abrir el code-behind de MainWindow.xaml que es MainWindow.cs; donde ya abierto, agregamos la libreria Microsoft.Kinect, las siguientes Microsoft.Speech.AudioFormat y Microsoft.Speech.Recognition
using Microsoft.Kinect;

using Microsoft.Speech.AudioFormat;
using Microsoft.Speech.Recognition;
siguiendo con el codigo creamos 5 variables de tipo SolidColorBrush y le di a cada una un color y creamos la variable kinect de tipo KinectSensor, un DispatcherTimer que le llame readyTimer y dos variables muy interesantes que vienen de la libreria Speech que son EnergyCalculatingPassThroughStream que es la variable que contendra el espectro de la energia y la forma de la voz sintetizada para a travez de la segunda variable que es la que crea una especie de gramatica dependiendo de la cultura y el enfasis de la voz la como se muestra en el siguiente codigo.
 private readonly SolidColorBrush redBrush = new SolidColorBrush(Colors.Red);
 private readonly SolidColorBrush greenBrush = new SolidColorBrush(Colors.Green);
 private readonly SolidColorBrush yellowBrush = new SolidColorBrush(Colors.Yellow);
 private readonly SolidColorBrush blueBrush = new SolidColorBrush(Colors.Blue);
 private readonly SolidColorBrush WhiteBrush = new SolidColorBrush(Colors.White);

 KinectSensor kinect;

 private DispatcherTimer readyTimer;
 private EnergyCalculatingPassThroughStream stream;
 private SpeechRecognitionEngine speechRecognizer;
«Suena dificil y complejo pero son solo sencillas primitivas para trabajar el reconocimiento de voz en nuestras aplicaciones».. aca les dejo unas rutinas establecidas para el control de la voz, sintetizarla y despues tomarla en la variable para asi ahora poder trabajar con ella a travez del Kinect, por ahora solo les dejo el siguiente codigo:
 private class EnergyCalculatingPassThroughStream : Stream
 {
   private const int SamplesPerPixel = 10;

   private readonly double[] energy = new double[500];
   private readonly object syncRoot = new object();
   private readonly Stream baseStream;

   private int index;
   private int sampleCount;
   private double avgSample;

 public EnergyCalculatingPassThroughStream(Stream stream)
 {
   this.baseStream = stream;
 }

 public override long Length
 {
   get { return this.baseStream.Length; }
 }

 public override long Position
 {
   get { return this.baseStream.Position; }
   set { this.baseStream.Position = value; }
 }

 public override bool CanRead
 {
   get { return this.baseStream.CanRead; }
 }

 public override bool CanSeek
 {
   get { return this.baseStream.CanSeek; }
 }

 public override bool CanWrite
 {
   get { return this.baseStream.CanWrite; }
 }

 public override void Flush()
 {
   this.baseStream.Flush();
 }

 public void GetEnergy(double[] energyBuffer)
 {
   lock (this.syncRoot)
   {
     int energyIndex = this.index;
     for (int i = 0; i < this.energy.Length; i++)       {       energyBuffer[i] = this.energy[energyIndex];       energyIndex++;       if (energyIndex >= this.energy.Length)
     {
       energyIndex = 0;
     }
   }
  }
 }

  public override int Read(byte[] buffer, int offset, int count)
  {
    int retVal = this.baseStream.Read(buffer, offset, count);
    const double A = 0.3;
    lock (this.syncRoot)
    {
    for (int i = 0; i < retVal; i += 2)      {        short sample = BitConverter.ToInt16(buffer, i + offset);        this.avgSample += sample * sample;        this.sampleCount++;        if (this.sampleCount == SamplesPerPixel)        {          this.avgSample /= SamplesPerPixel;          this.energy[this.index] = .2 + ((this.avgSample * 11) / (int.MaxValue / 2));          this.energy[this.index] = this.energy[this.index] > 10 ? 10 : this.energy[this.index];

        if (this.index > 0)
        {
          this.energy[this.index] = (this.energy[this.index] * A) + ((1 - A) * this.energy[this.index - 1]);
        }

     this.index++;

     if (this.index >= this.energy.Length)
     {
       this.index = 0;
     }

       this.avgSample = 0;
       this.sampleCount = 0;
    }
   }
  }

  return retVal;
 }

  public override long Seek(long offset, SeekOrigin origin)
  {
    return this.baseStream.Seek(offset, origin);
  }

  public override void SetLength(long value)
  {
    this.baseStream.SetLength(value);
  }

  public override void Write(byte[] buffer, int offset, int count)
  {
    this.baseStream.Write(buffer, offset, count);
  }
 }
Y aca les dejo todo codigo fuente para poner a andar nuestro Kinect por voz y en español!…. despues les seguire mostrando detalladamente cada una de las funcionalidades de este demo para que lo apliquen a un sin fin de cosas.
using System;
using System.Collections.Generic;
using System.IO;
using System.Linq;
using System.Threading;
using System.Windows;
using System.Windows.Controls;
using System.Windows.Media;
using System.Windows.Media.Imaging;
using System.Windows.Threading;

using Microsoft.Kinect;

using Microsoft.Speech.AudioFormat;
using Microsoft.Speech.Recognition;
namespace WpfAudioKinectPruebaHablar
{
 ///
 /// Interaction logic for MainWindow.xaml
 ///
 public partial class MainWindow : Window
 {
 private readonly SolidColorBrush redBrush = new SolidColorBrush(Colors.Red);
 private readonly SolidColorBrush greenBrush = new SolidColorBrush(Colors.Green);
 private readonly SolidColorBrush yellowBrush = new SolidColorBrush(Colors.Yellow);
 private readonly SolidColorBrush blueBrush = new SolidColorBrush(Colors.Blue);
 private readonly SolidColorBrush WhiteBrush = new SolidColorBrush(Colors.White);

 KinectSensor kinect;

 private DispatcherTimer readyTimer;
 private EnergyCalculatingPassThroughStream stream;
 private SpeechRecognitionEngine speechRecognizer;

 #region class EnergyCalculatingPassThroughStream

 private class EnergyCalculatingPassThroughStream : Stream
 {
 private const int SamplesPerPixel = 10;

 private readonly double[] energy = new double[500];
 private readonly object syncRoot = new object();
 private readonly Stream baseStream;

 private int index;
 private int sampleCount;
 private double avgSample;

 public EnergyCalculatingPassThroughStream(Stream stream)
 {
 this.baseStream = stream;
 }

 public override long Length
 {
 get { return this.baseStream.Length; }
 }

 public override long Position
 {
 get { return this.baseStream.Position; }
 set { this.baseStream.Position = value; }
 }

 public override bool CanRead
 {
 get { return this.baseStream.CanRead; }
 }

 public override bool CanSeek
 {
 get { return this.baseStream.CanSeek; }
 }

 public override bool CanWrite
 {
 get { return this.baseStream.CanWrite; }
 }

 public override void Flush()
 {
 this.baseStream.Flush();
 }

 public void GetEnergy(double[] energyBuffer)
 {
 lock (this.syncRoot)
 {
 int energyIndex = this.index;
 for (int i = 0; i < this.energy.Length; i++) { energyBuffer[i] = this.energy[energyIndex]; energyIndex++; if (energyIndex >= this.energy.Length)
 {
 energyIndex = 0;
 }
 }
 }
 }

 public override int Read(byte[] buffer, int offset, int count)
 {
 int retVal = this.baseStream.Read(buffer, offset, count);
 const double A = 0.3;
 lock (this.syncRoot)
 {
 for (int i = 0; i < retVal; i += 2) { short sample = BitConverter.ToInt16(buffer, i + offset); this.avgSample += sample * sample; this.sampleCount++; if (this.sampleCount == SamplesPerPixel) { this.avgSample /= SamplesPerPixel; this.energy[this.index] = .2 + ((this.avgSample * 11) / (int.MaxValue / 2)); this.energy[this.index] = this.energy[this.index] > 10 ? 10 : this.energy[this.index];

 if (this.index > 0)
 {
 this.energy[this.index] = (this.energy[this.index] * A) + ((1 - A) * this.energy[this.index - 1]);
 }

 this.index++;

 if (this.index >= this.energy.Length)
 {
 this.index = 0;
 }

 this.avgSample = 0;
 this.sampleCount = 0;
 }
 }
 }

 return retVal;
 }

 public override long Seek(long offset, SeekOrigin origin)
 {
 return this.baseStream.Seek(offset, origin);
 }

 public override void SetLength(long value)
 {
 this.baseStream.SetLength(value);
 }

 public override void Write(byte[] buffer, int offset, int count)
 {
 this.baseStream.Write(buffer, offset, count);
 }
 }
 #endregion

public MainWindow()
{
 InitializeComponent();

 kinect = KinectSensor.KinectSensors[0];

 if (this.kinect != null)
 {
 this.InitializeKinect();
 }
}

 private void Start()
 {
 var audioSource = this.kinect.AudioSource;
 audioSource.BeamAngleMode = BeamAngleMode.Adaptive;

 audioSource.EchoCancellationMode = EchoCancellationMode.CancellationAndSuppression;
 var kinectStream = audioSource.Start();

 this.stream = new EnergyCalculatingPassThroughStream(kinectStream);
 this.speechRecognizer.SetInputToAudioStream(this.stream, new SpeechAudioFormatInfo
 (EncodingFormat.Pcm, 16000, 16, 1, 32000, 2, null));
 this.speechRecognizer.RecognizeAsync(RecognizeMode.Multiple);
 }

 private static RecognizerInfo GetKinectRecognizer()
 {
 Func<RecognizerInfo, bool> matchingFunc = r =>
 {
 string value;
 r.AdditionalInfo.TryGetValue("Kinect", out value);
 return "True".Equals(value, StringComparison.InvariantCultureIgnoreCase) &&
 "es-ES".Equals(r.Culture.Name,StringComparison.InvariantCultureIgnoreCase);
 };
 return SpeechRecognitionEngine.InstalledRecognizers().Where(matchingFunc).FirstOrDefault();
 }

 private SpeechRecognitionEngine CreateSpeechRecognizer()
 {
 RecognizerInfo ri = GetKinectRecognizer();
 if (ri == null)
 {
 MessageBox.Show(@"Hay un problema al inicializar el dispositivo de reconocimiento de voz.
 asegurese de tener Microsoft Speech SDK instalado y configurado.",
 "Falla al cargar Speech SDK", MessageBoxButton.OK, MessageBoxImage.Error);

 this.Close();
 return null;
 }

 SpeechRecognitionEngine sre;
 try
 {
 sre = new SpeechRecognitionEngine(ri.Id);
 }
 catch
 {
 MessageBox.Show(@"Hay un problema al inicializar el dispositivo de reconocimiento de voz.
 asegurese de tener Microsoft Speech SDK instalado y configurado.", "Falla al cargar Speech SDK",
 MessageBoxButton.OK, MessageBoxImage.Error);
 this.Close();
 return null;
 }

 var colors = new Choices();
 colors.Add("rojo");
 colors.Add("verde");
 colors.Add("azul");
 colors.Add("amarillo");

 var gb = new GrammarBuilder { Culture = ri.Culture };
 gb.Append(colors);

 // Create the actual Grammar instance, and then load it into the speech recognizer.
 var g = new Grammar(gb);

 sre.LoadGrammar(g);
 sre.SpeechRecognized += this.SreSpeechRecognized;
 sre.SpeechHypothesized += this.SreSpeechHypothesized;
 sre.SpeechRecognitionRejected += this.SreSpeechRecognitionRejected;

 return sre;
 }

 private void RejectSpeech(RecognitionResult result)
 {
 string status = "Rechazado: " + (result == null ? string.Empty : result.Text + " " + result.Confidence);
 this.ReportSpeechStatus(status);

 Dispatcher.BeginInvoke(new Action(() => { tbColor.Background = WhiteBrush; }), DispatcherPriority.Normal);
 }

 private void SreSpeechRecognitionRejected(object sender, SpeechRecognitionRejectedEventArgs e)
 {
 this.RejectSpeech(e.Result);
 }

 private void SreSpeechHypothesized(object sender, SpeechHypothesizedEventArgs e)
 {
 this.ReportSpeechStatus("Hipotetico: " + e.Result.Text + " " + e.Result.Confidence);
 }

 private void SreSpeechRecognized(object sender, SpeechRecognizedEventArgs e)
 {
 SolidColorBrush brush;

 if (e.Result.Confidence < 0.7) { this.RejectSpeech(e.Result); return; } switch (e.Result.Text.ToUpperInvariant()) { case "ROJO": brush = this.redBrush; break; case "VERDE": brush = this.greenBrush; break; case "AZUL": brush = this.blueBrush; break; case "AMARILLO": brush = this.yellowBrush; break; default: brush = this.WhiteBrush; break; } string status = "Reconocido: " + e.Result.Text + " " + e.Result.Confidence; this.ReportSpeechStatus(status); Dispatcher.BeginInvoke(new Action(() => { tbColor.Background = brush; }), DispatcherPriority.Normal);
 }

 private void ReportSpeechStatus(string status)
 {
 Dispatcher.BeginInvoke(new Action(() => { tbSpeech.Text = status; }), DispatcherPriority.Normal);
 }

 private void UpdateInstructionsText(string instructions)
 {
 Dispatcher.BeginInvoke(new Action(() => { tbInfo.Text = instructions; }), DispatcherPriority.Normal);
 }

 private void MainWindowClosing(object sender, System.ComponentModel.CancelEventArgs e)
 {
 this.UninitializeKinect();
 }

 private void ReadyTimerTick(object sender, EventArgs e)
 {
 this.Start();
 this.ReportSpeechStatus("Listo para reconocer voz!");
 this.UpdateInstructionsText("Diga: 'rojo', 'verde', 'amarillo' o 'azul'");
 this.readyTimer.Stop();
 this.readyTimer = null;
 }

 private void InitializeKinect()
 {
 var sensor = this.kinect;
 this.speechRecognizer = this.CreateSpeechRecognizer();
 try
 {
 sensor.Start();
 }
 catch (Exception)
 {

 }

 if (this.speechRecognizer != null && sensor != null)
 {
 // NOTE: Need to wait 4 seconds for device to be ready to stream audio right after initialization
 this.readyTimer = new DispatcherTimer();
 this.readyTimer.Tick += this.ReadyTimerTick;
 this.readyTimer.Interval = new TimeSpan(0, 0, 4);
 this.readyTimer.Start();

 this.ReportSpeechStatus("Inicializando el dispositivo de audio Kinect...");
 this.UpdateInstructionsText(string.Empty);

 this.Closing += this.MainWindowClosing;
 }
 }

 private void UninitializeKinect()
 {
 var sensor = this.kinect;

 if (this.speechRecognizer != null && sensor != null)
 {
 sensor.AudioSource.Stop();
 sensor.Stop();
 this.speechRecognizer.RecognizeAsyncCancel();
 this.speechRecognizer.RecognizeAsyncStop();
 }

 if (this.readyTimer != null)
 {
 this.readyTimer.Stop();
 this.readyTimer = null;
 }
 }

 }
}
nota: esta entrada esta sujeta a cambios por la actualizacion de la libreria KINECT, luego les seguire comentando acerca de esto, por ahora solo les adelanto este post!…